Resurrection and Modification of an Old Inexpensive Factory Guitar
An originally inexpensive, old, damaged guitar that also had original construction issues was brought back to playable condition. The work described here is not so much restoration as it is resurrection. The work included fixing cracks in the ribs and neck block, adding a bridge plate, re-gluing the bridge, thinning and reshaping the neck shaft, and resetting the neck. Serious intonation issues made it clear that either the bridge would have to be moved and also a couple of frets moved, or a new fretboard would have to be fashioned. Details of the work are described. This article originally appeared in American Lutherie.
Initial appearance: November 2, 2026
Last updated:
November 02, 2026
Resurrection and Modification of an Old Inexpensive Factory Guitar
Copyright © 2019 R.M. Mottola
[This article originally appeared in American Lutherie #138.]
My friend and mentor the late Jim Mouradian had a customer that regularly brought him old and very beat up archtop guitars to be converted to electrics. These instruments were always built by the less distinguished factories. In addition to adding magnetic pickups, what the customer wanted Jim to do was, essentially, to turn these sow's ears into functional silk purses, that is, to make them into reliable, stable and good-playing instruments. But he also wanted them to still look as worn and beat up and cheap as they actually were. I won’t go into the details of the work here, but will say that the results were pretty cool. I recently completed an interesting project along these same lines only in this case the guitar was a small flat top. I should point out a couple of things up front, the first of which is that putting this amount of work into a cheap instrument is not really economically viable. It is unlikely the resulting instrument will ever be worth the cost of the repair work. And the second thing is that the project I am describing here is not restoration but resurrection and modification. The term resurrection was coined by John Calkin, who aptly describes the difference between restoring a valuable antique to original playing condition and simply getting a low value instrument into playable condition in a fast, efficient and inexpensive fashion (see "Resurrecting the Family Guitar" in American Lutherie #85).
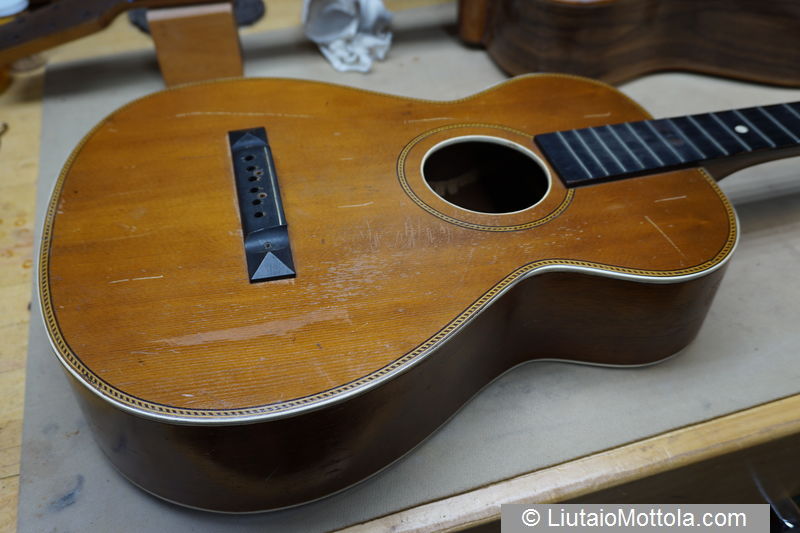
Photo 1 - B&J Serenader single O size guitar, probably built by Oscar Schmidt in the mid-1920s.
The subject instrument is a 12 fret single O size guitar with the name "The Serenader" from a New York company called B&J (photos 1 and 2). B&J is short for Buegeleisen and Jacobson, a New York City musical instrument distributor started circa 1897. There is no indication this company built anything themselves so this guitar is likely a house branded instrument built by a factory. I could find no definitive documentation on the builder, but the guitar looks identical to the "standard" (aka "concert") size instrument built by Oscar Schmidt and sold under the Stella brand in the mid-1920s. The top is ladder braced spruce, of a quality that today would be graded very highly. There is no bridge plate or soundhole reinforcement. Back and sides are mahogany. There are inlaid marquetry purflings and soundhole decoration. Bindings are celluloid as are the bridge pins. The bridge, fretboard and nut are made of maple, painted flat black. The bridge saddle is a length of fretwire (photo 3). The neck, blocks and linings are made of tulip poplar. The instrument is finished with only one or two coats of sprayed pigmented nitrocellulose lacquer. All fairly typical of a low end instrument of the period. From what I could gather, in its day this was about the cheapest guitar you could buy in this country.
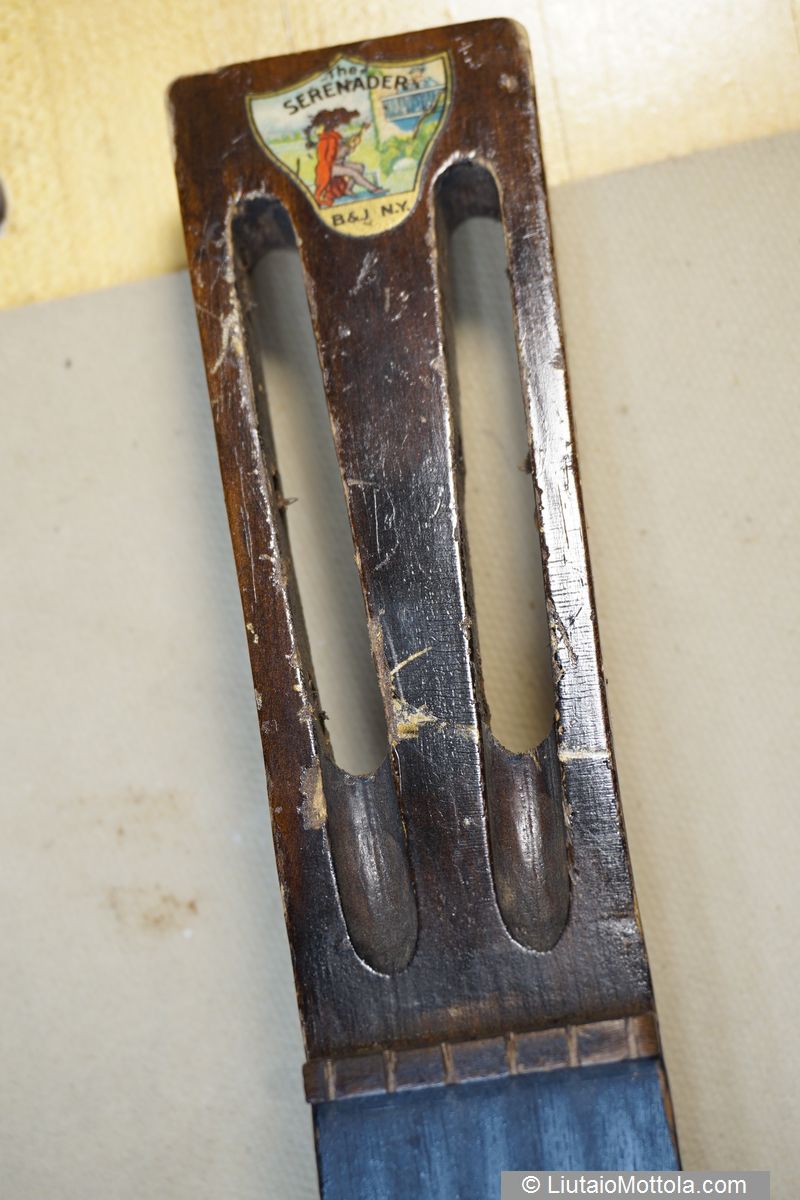
Photo 2 - B&J Serenader headstock showing decal.
The design of the guitar is conventional but there are three aspects of the design that were of interest in the context of this project. As mentioned, the bridge has a fretwire saddle, and this does not lend itself to saddle height adjustments to action. Also mentioned is that the neck is made of tulip poplar and during disassembly I would find that this had no added stiffening. Probably to maintain neck rigidity under string tension, the neck was made generously thick. At over 0.25" (6.4mm) thicker than is conventional in modern instruments, the neck was uncomfortable to the extent of being unplayable. The third interesting design feature is the very narrow width of the headstock, seen in photo 2. It does not widen out at the shaft-to-headstock transition as is conventional, and as a result the outer strings rub hard against the lower outside edges of the headstock slots. This was likely done as a cost saving measure, allowing the use of a much narrower neck blank than would be needed to make a headstock with more conventional width.
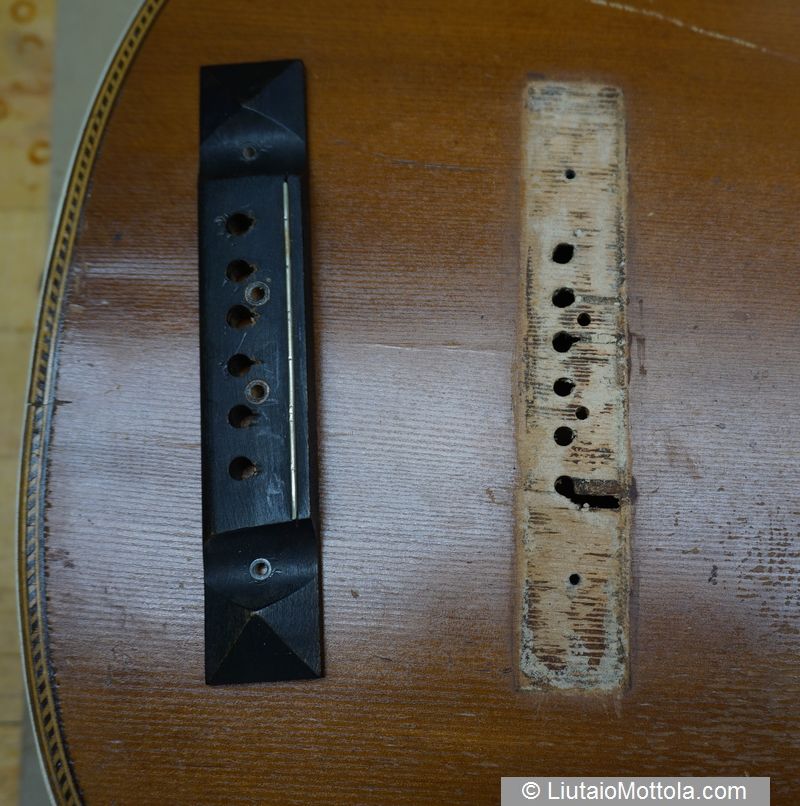
Photo 3 - The original bridge saddle is a piece of fretwire.
Construction was shoddy by today’s standards, even for low-cost instruments. I had the Serenader side-by-side with a modern $200 instrument by Cordoba, and the differences in fit and finish were striking. Other than a few sharp fret ends the construction of the Cordoba guitar was exemplary. In contrast the insides of the Serenader were a mess - everything rough sawn, glue all over the place (photo 4). The bindings were haphazardly scraped. There were large-grit sanding scratches on the heel, and the back of the headstock was not sanded at all, the finish applied right over the saw marks. No complaints from me on any of this. I’m sure this is just what you had to do back in the day to come in at a price point suitable for such an instrument. But there were two aspects of the construction of this guitar that I would have to deal with in my project. The first was that the locations of the frets on the fretboard were only approximate. Two frets would have to be moved if intonation was to be at all acceptable. And the second thing was that the bridge had been misplaced by the factory. It was over 0.25" (6.4mm) closer to the nut than it should have been. Although the instrument was well used and obviously heavily played it really could not have been used for anything but basic first-position playing.
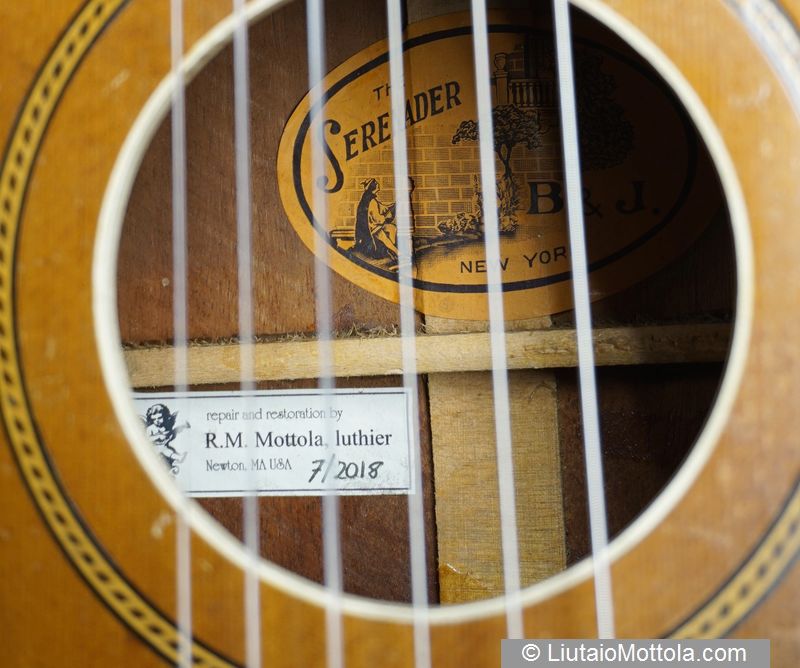
Photo 4 - This photo, taken after the project was completed, shows the general crude level of interior work. Braces are rough sawn and there is a lot of glue slopped around inside. I typically would not place my repair label so directly under the soundhole, but this was about the only spot clear of glue drops.
The condition of the instrument was both beat up and structurally damaged. The bridge had come off at some point and was re-attached with four bolts, using a length of oak molding as a bridge plate. There were cracks in the ribs on either side of the heel and the neck was loose – it could be levered from side to side. When this was done, the part of the rib that was above the crack on the right side of the body moved in and out, indicating a loose or cracked neck block. The heel had pulled away from the ribs at its end. A length of lining between the ribs and top on the right side of the neck block had been replaced with canvas soaked in glue, further confirming some structural damage in this area. The rib crack on the left side of the heel had been functionally repaired. As is almost always the case with unrestored inexpensive instruments of this vintage, the action was unusably high, measuring over 0.3" (7.6mm) at the 12th fret. This is likely the result of the use of steel strings at some point in the guitar’s life. There were steel strings on the instrument when I got it.
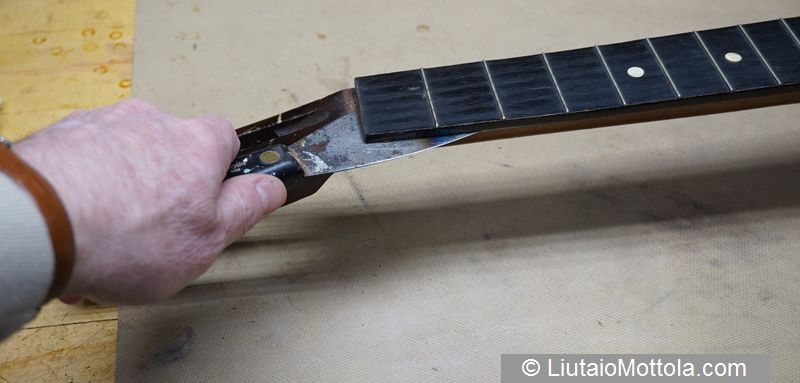
Photo 5 - Removing the original fretboard.
My plan of action was to perform a forensic analysis of the cracks to determine the extent of the repair work needed, and to analyze the guitar’s intonation problems and determine how best to fix those. Whatever other work was needed it was already clear that adding a bridge plate, re-gluing the bridge, thinning and reshaping the neck shaft, and resetting the neck would need to be done. Looking at the intonation issues it became clear that either the bridge would have to be moved and also a couple of frets moved, or a new fretboard would have to be built and installed. I opted for the new fretboard. So the original fretboard was removed (photo 5).
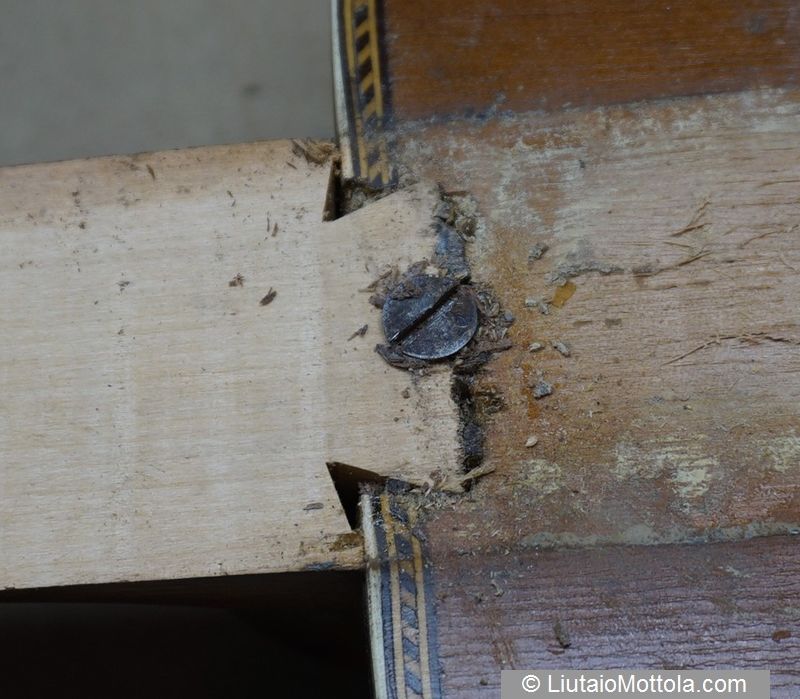
Photo 6 - Removing the fretboard revealed a large wood screw that had been driven through the fretboard and into the tenon, probably in an ineffective attempt to tighten the loose neck.
In the process of removing it I discovered a large wood screw had been driven through the fretboard and into the tenon (photo 6). I surmise this was a blind attempt at fixing the loose neck. The screw was removed. Since the instrument was going to require a neck reset, the neck was removed next (photo 7).
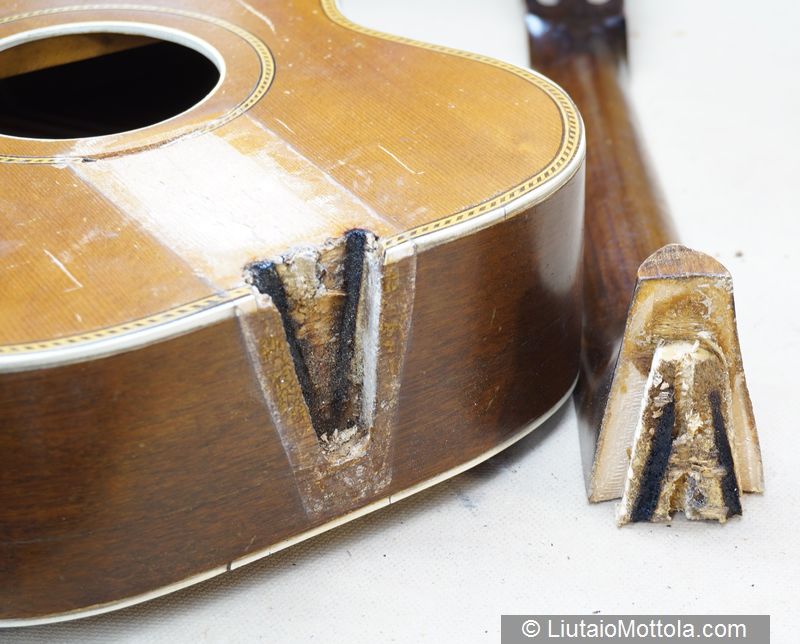
Photo 7 - The neck is removed.
As mentioned the bridge was attached with four bolts going through a length of molding serving as a bridge plate. The bolts were removed and the bridge and plate removed from the instrument. With neck and bridge off it was easier to examine the known cracks and to look for other damage. Doing so made it possible to come to some conclusions about the damage that the instrument suffered, which in turn guided my search for any additional damage that may not have been obvious.
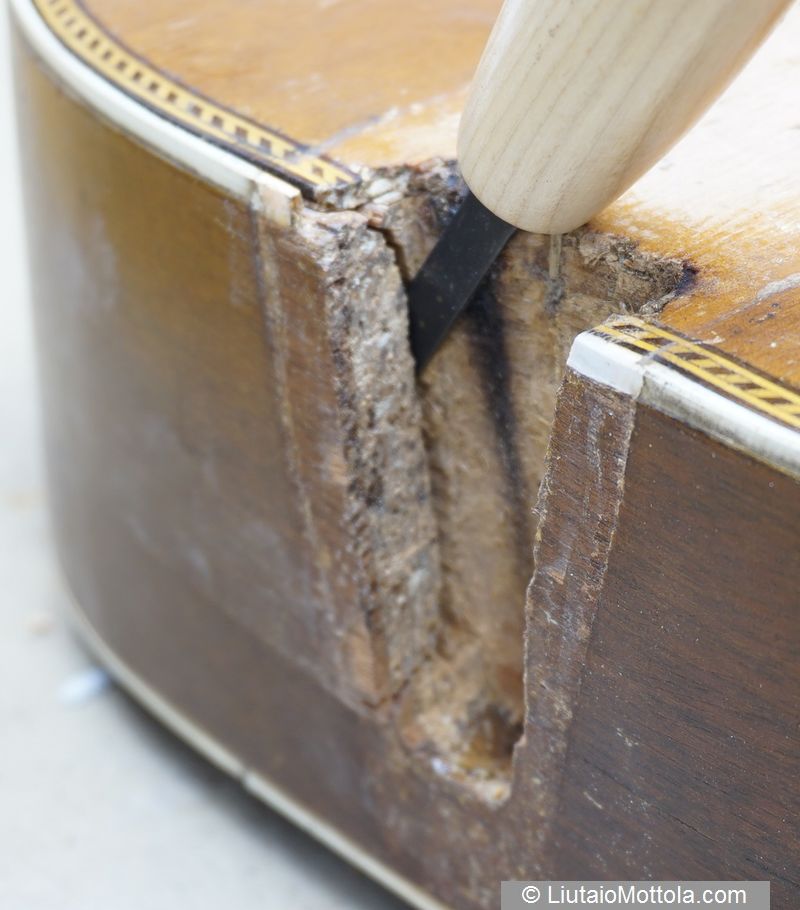
Photo 8 - Removing the neck revealed the source of the loose neck, a vertical crack in one side of the neck block.
It looks like the guitar suffered a sharp blow to the fretboard, forcing the neck backward. The force of the blow abruptly tensioned the strings, ripping the bridge off. It also cracked the neck block at the right side of the mortise (photo 8) and the upper piece of the block still attached to the rib but free of the rest of the block continued to move outward, cracking the rib (photo 9) and tearing the upper part of the rib away from the top and lining. All of this could be glued back together but I first examined the neck block and its glue joints carefully for other trauma. Not finding anything else loose or broken, the cracks in the neck block and rib were repaired. The previous replacement of the missing lining with cloth was still intact so that was left alone. After the glue was cured the dovetail mortise was scraped clean.
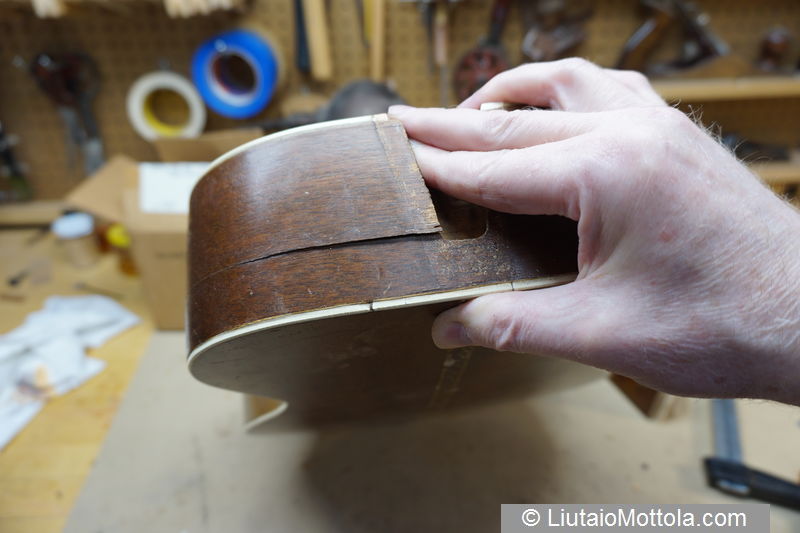
Photo 9 - The crack in the neck block allowed outward movement of the piece of the block attached to the rib, which cracked the rib as well.
Since I would be replacing the fretboard with one of a different scale length, the bridge could be reattached at its original position. First, the fretwire saddle was removed and a slot for a saddle was routed in its place (photos 10 and 11).
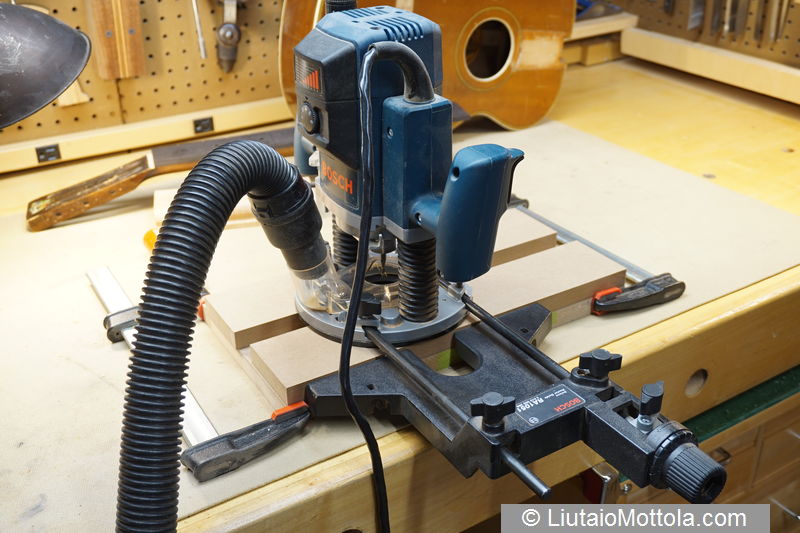
Photo 10 - A simple temporary routing jig was made from MDF pieces double sticky taped together and used to route a saddle slot in the bridge. The bridge is captured in the slot in the jig. The bar clamps serve as stops to limit travel of the router.
Old glue was cleaned up from the bottom of the bridge and from the top and the bridge was chalk fitted (photo 12).
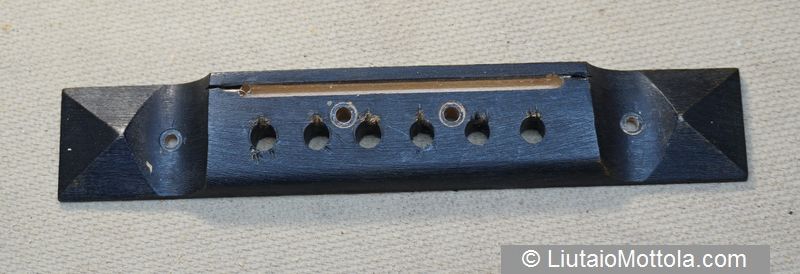
Photo 11 - The routed saddle slot. The ends of the original fretwire slot would be filled with veneer to help prevent cracking there. Note the four holes from a previous repair that were used to bolt on the bridge.
This did not require substantial time as the fit was pretty good already.
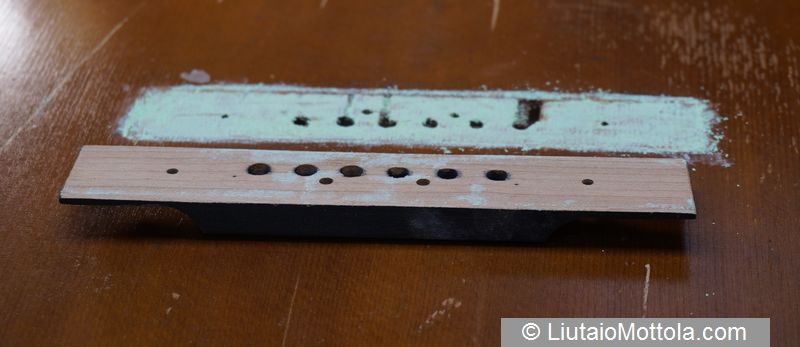
Photo 12 - The bridge was chalk fitted in preparation for re-gluing.
My original thought was to fashion the length of molding that served as a bridge plate into an actual bridge plate. It had after all some history with the guitar which I wanted to preserve if possible. But unfortunately the pin holes in the piece of molding were too big, so I opted to fashion a new bridge plate from a 0.1” (2.5mm) thick piece of walnut (photo 13).
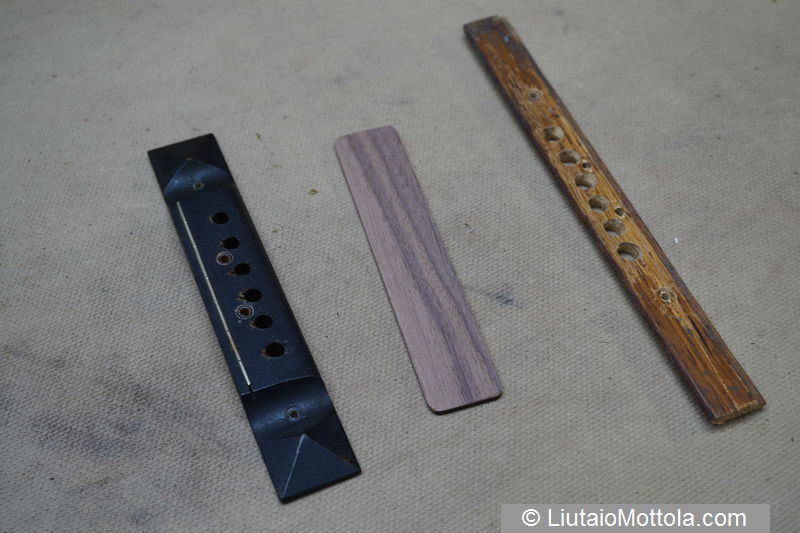
Photo 13 - The original bridge, the new walnut bridge plate, and the length of oak molding that was being used as a bolt-on bridge plate.
The old bridge plate was used as a template and holes were drilled in the new bridge plate for the four bolts that attached the bridge. Glue was applied to the bridge plate and bridge and both were bolted to the top with the old bolts to align them. Then cauls and clamps were applied and the glue allowed to cure. Afterward, pilot holes for the bridge pins were drilled through the new bridge plate and then these were roughly reamed. No attempt was made to fill the holes in the bridge left by the bolts. Again, the project is a resurrection not a restoration. And the holes are a part of the guitar’s history.
The original black painted maple fretboard was 0.188" (4.8mm) thick. I calculated it had a nominal scale length of 24.27" (616.5mm), using methods detailed in the article "Measuring Scale Length of Fretted Instruments" (American Lutherie #136). As mentioned the bridge was not located properly for this fretboard. A new 0.25" (6.4mm) thick ebony fretboard was fashioned. I calculated that a 24" (609.6mm) scale length could be used with the bridge in its original location and that this would provide appropriate compensation for nylon strings (photo 14).
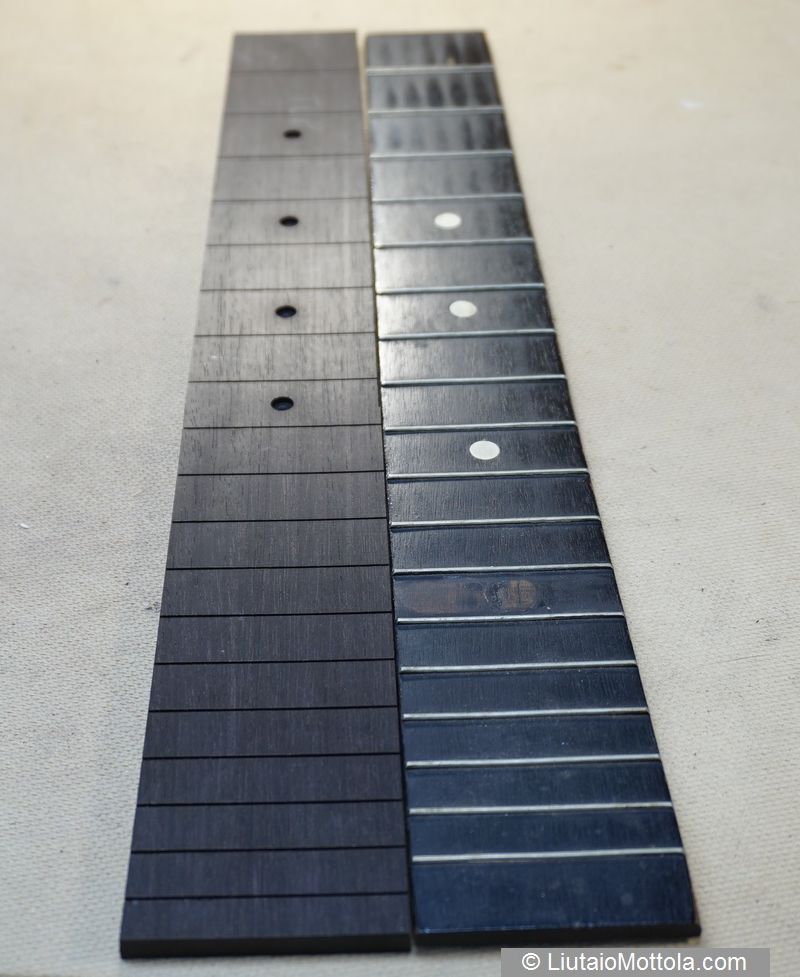
Photo 14 - New 24" scale length ebony and original 24.27" black painted maple fretboards. The new board has dot markers in the modern locations and also got an extra fret.
Although I gave some thought to constructing the new fretboard out of maple and painting it, something I would have done if this was a true restoration project, my experience with finished fretboards is that it is tedious to do fretwork on them to avoid dinging up the paint. So I opted for ebony. Fret slots were cut on a CNC machine. Since I was making a new fretboard anyway I added Fender style "clay" marker dots at frets 3, 5, 7, and 9. In keeping with the overall workmanship of the original instrument, the fretboard was sanded only up to 120 grit. I would have fretted it with the 0.04" (1mm) wide fretwire of the original if I could have found any, but opted for the next biggest modern size.
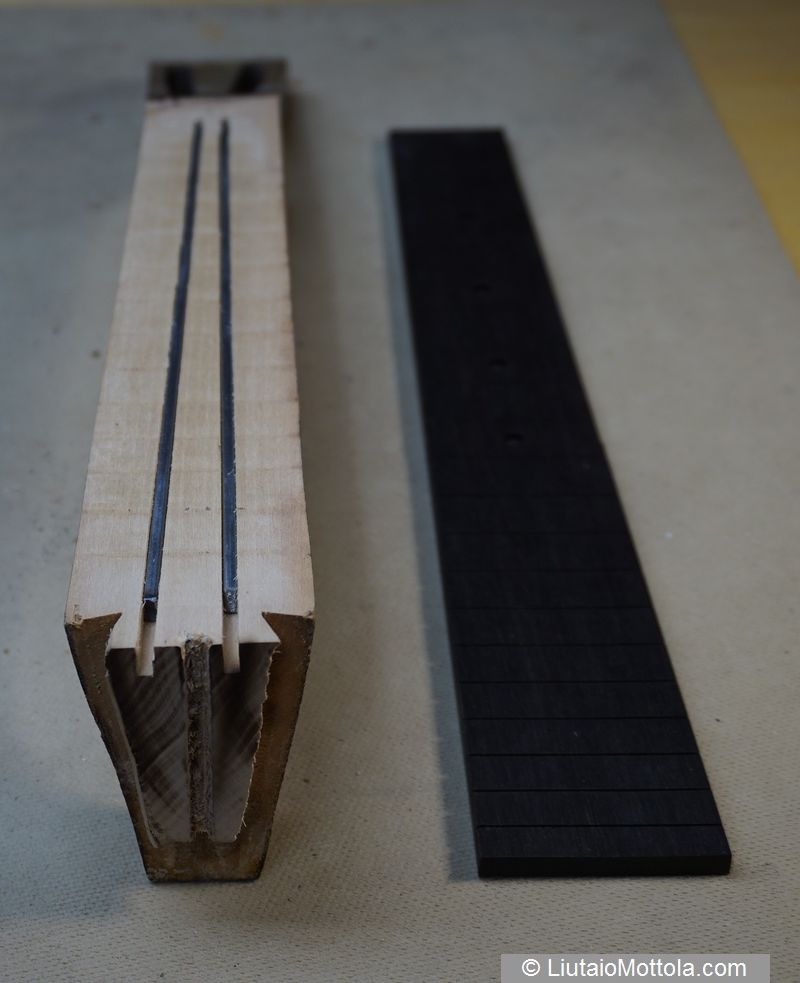
Photo 15 - Steel bars are added to stiffen the neck, which will be shaped thinner than original for playability.
The fretboard gluing surface of the neck was cleaned up. Before the fretboard was glued on, two 0.25" (6.4mm) x 0.125" (3.2mm) mild steel neck reinforcing bars were installed in the neck in routed channels (photo 15). The original neck and fretboard clearly stood up well over time under string tension, even under steel string tension. But my intention was to thin the neck considerably which would of course considerably reduce its stiffness. I would be adding some additional stiffness with the use of a thicker and stiffer fretboard. Although it is possible to calculate stiffness of both the original and the reworked neck from material properties and neck cross section to determine how much additional stiffening should be added, here I didn't bother with calculations. Just guesstimated and added the steel bars. The new fretboard was glued to the neck and clamped.
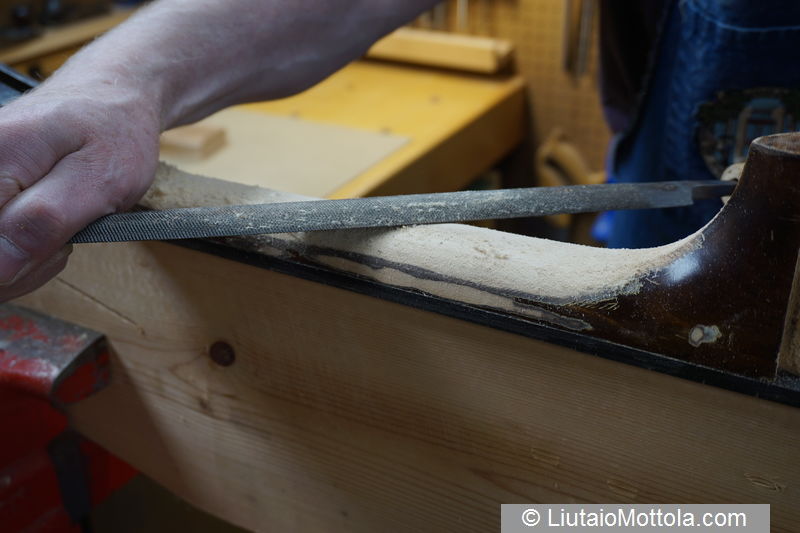
Photo 16 - Thinning and reshaping the neck shaft.
The good news about the original neck shaft profile is that it was a comfortable rounded shape, but the bad news is that it was Louisville Slugger thick. In this project I thinned the shaft along its length to a more playable thickness and reshaped the neck a bit in the process (photo 16). The neck was made of tulip poplar, a difficult species to carve because it tends to fuzz up, even when using edge tools. After shaping and sanding smooth I feathered the edges of the finish remaining on the heel and headstock transition areas. This was done to aid in the refinishing of the carved areas of the shaft (photo 17).
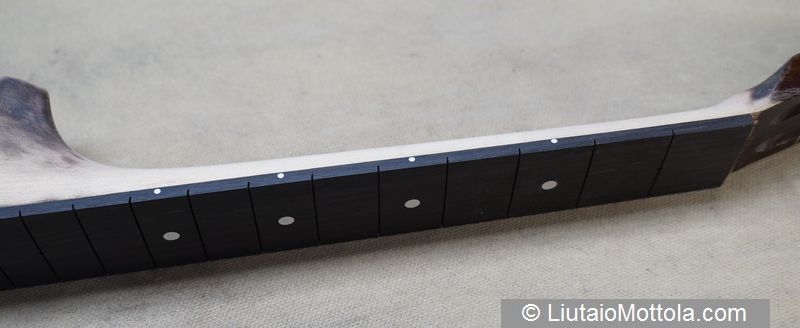
Photo 17 - Reshaped neck shaft. The remaining finish was feathered to aid in refinishing.
If this had been a restoration project I would have mixed up some pigmented lacquer to match the original color of the neck, mixing pigments to the lacquer on glass held over the neck so I could get an accurate color match. Such work is tedious and was frankly too much trouble for this resurrection project. I rooted around in my furniture refinishing supplies and came up with a can of hardware store varnish stain that was close in color. It was a bit lighter in shade and a bit redder than the original finish, so I used that stain and a lighter color stain to stain the neck in the style typical of violin family instruments. The light stain was wiped onto the bare wood using a rag, then a bit of the dark stain was applied only to the ends near where the original finish remained (photo 18). The stain was let dry for a bit and then lightly rubbed with a dry rag to blend the colors at their transitions. Then it was allowed to dry completely. A couple of coats of satin spray lacquer would have been appropriate as a top coat but the weather at the time was not appropriate for spraying, so a couple of coats of polyurethane floor varnish were padded on with a rag.
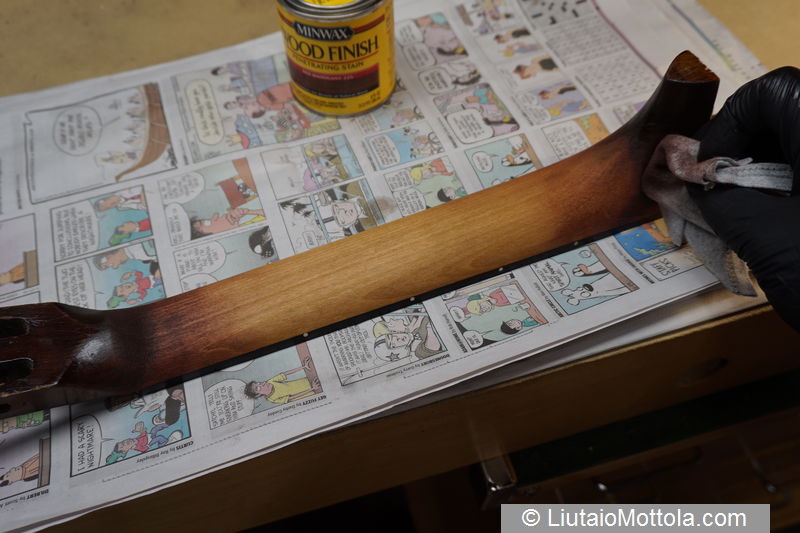
Photo 18 - The neck was stained using hardware store stains applied with a rag.
The next step was resetting the neck. The tenon was cleaned up and any loose pieces of original veneer used to tighten the joint were re-glued or removed. The amount the heel cheeks needed to be cut back was determined using an online calculator on my website. I was shooting for low nylon string action, about 0.09" (2.29mm) on the low E string, measured at the 12th fret. The cheeks were trimmed and straightened on a sanding board. The tenon was built up with mahogany veneer pieces and then the joint was chalk fitted. Yaw was adjusted and then the neck was glued to the body.
When doing a neck reset I am in the habit of fashioning and installing the wedge under the fretboard extension after the neck is glued on. This is idiosyncratic enough that it warrants a description of the process. A straight edge is laid on the frets over the neck at the centerline and a small temporary wedge of wood is pushed between the top and the end of the fretboard until the frets on the fretboard extension contact the straight edge. Then the distance between the top and the underside of the extension is measured. A blank for the extension wedge is cut oversize and thicknessed to that distance. A thin strip is cross cut off the end of the blank. Then the blank is cut to the appropriate length. A backup board of the same width as the blank but somewhat longer is cut from MDF. The blank is attached to the backup board with double stick tape. The thin strip is glued to the back of the backup board, opposite one end of the blank, using cyanoacrylate. Then a fence is positioned next to the drum of a spindle sander so the gap between sanding drum surface and fence is the same as the thickness of the blank plus backup board. The blank and backup board is positioned against the fence so the thin attached strip is touching the fence and serves as a standoff. As the blank is pushed through the sander it gets sanded thinner and thinner as the standoff is approached. Because the standoff piece is the same thickness as the original blank, when the blank is pushed all the way through the sander that end tapers to nothing. The wedge is removed from the backup board with a knife. The center area of the thin end is cut away with a knife to provide clearance for the neck tenon. Then the wedge is slid into place and marked for the width and length of the fretboard extension. The wedge is carefully cut to the marks, then glued into place and clamped (photo 19).
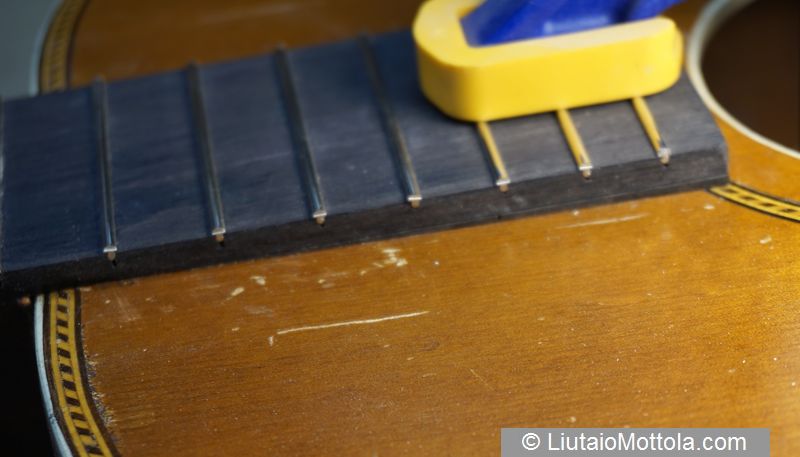
Photo 19 - Ebony wedge under the fretboard extension is glued in after the neck is attached.
The original black painted maple nut was not tall enough to be used with the new thicker fretboard so a new nut was fashioned. In order to maintain the original color esthetic I made the nut and matching saddle out of black phenolic material (Garolite XX). Saddle and nut were shaped, fitted and roughly sanded to match the level of finish of the originals (photos 20 and 21).
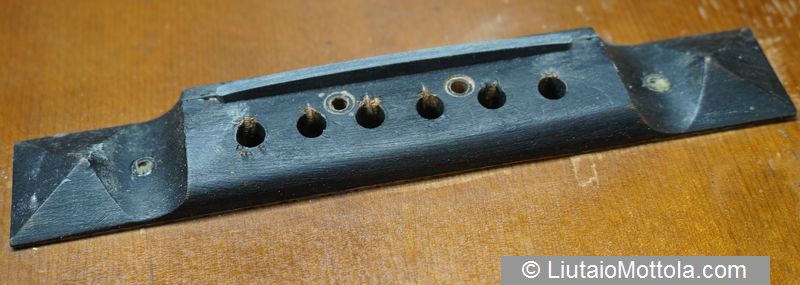
Photo 20 - Bridge with new phenolic saddle.
Steel string tension deformed the top badly, so I assume this guitar was originally intended to be used with gut strings. Even if that is not the case the structure cannot handle steel strings. I fitted a modern nylon string set. A hard tension set was used in partial compensation for the relatively short scale length. Although the instrument was well worn, no attempt was made to touch up the finish in any way. Any battle scars it suffered during the course of its life were part of its history. Because the top was so dark any of the newer scratches and dings that went right down to the spruce stood out in sharp contrast. Just to hasten the natural aging process a little dirt was rubbed into some of these.
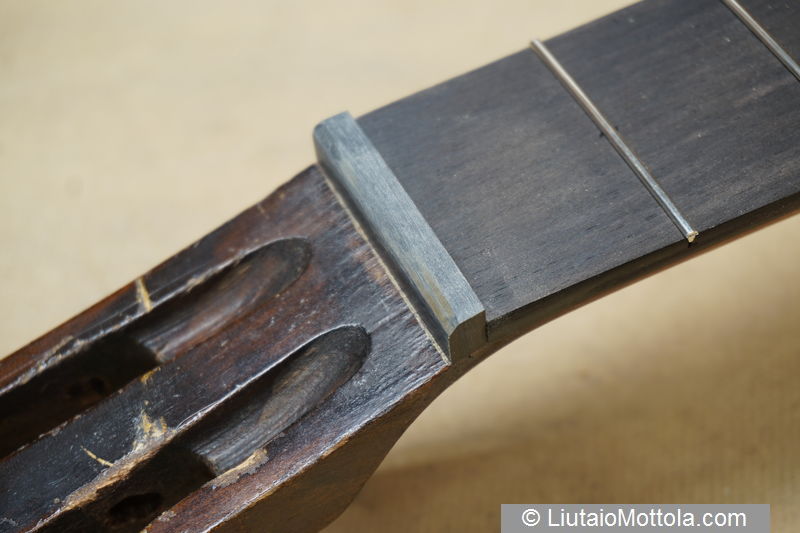
Photo 21 - New phenolic nut.
Following resurrection and modification (photos 22 and 23) the guitar sounds quite nice and its voice is typical of ladder braced guitars of this size no matter the pedigree of manufacture.
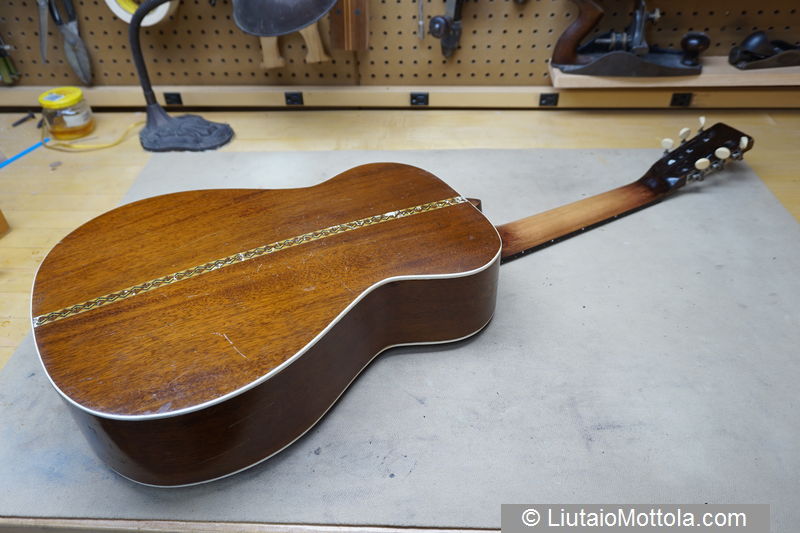
Photo 22 - Back, at project completion.
Action and intonation were vastly improved. The thinner neck made the instrument as comfortable to play as any modern instrument of this size. Although the effort put into the resurrection project was out of proportion to the value of the finished guitar, the end result was an old and funky-looking instrument with excellent tone that is stable and robust enough for real use for some time to come.
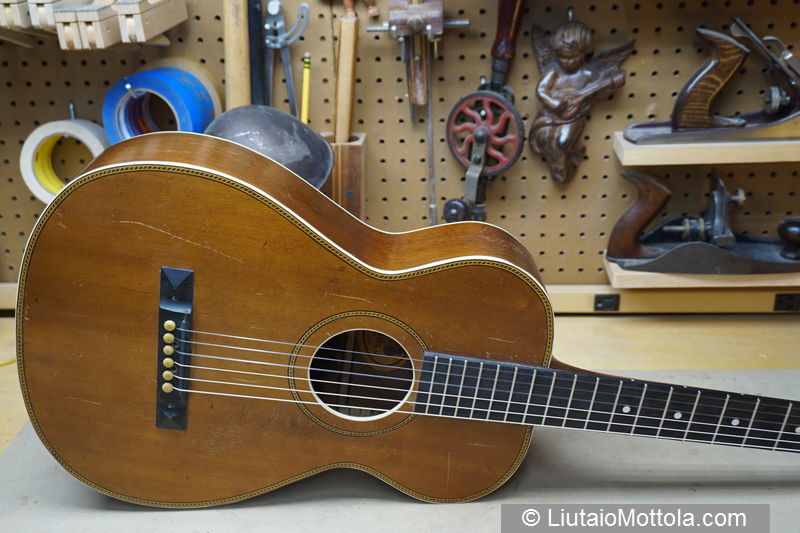
Photo 23 - Top, at project completion.