Sharpening, Honing and Polishing Gouges and Other Carving Tools
Luthiers generally don't do too much fancy carving and in fact most flat top and electric guitars are made with no carving at all. But the plates of archtop guitars and mandolins are carved and the scrolls of the violin family instruments represent some pretty serious wood carving. So some luthiers need to use carving gouges and other carving tools and of course these need to be sharpened and honed regularly with use. This page has instructions for doing all the sharpening, honing and polishing operations for a variety of carving tools, using the kinds of sharpening tools luthiers probably have in their shops.
Initially appeared September 4, 2007
Last updated:
July 19, 2025
Contents

For the longest time I had a small and odd collection of carving tools to use in carving bass scrolls, and I recently augmented this with the purchase of a nice used Marples set from eBay. The tools are fairly old and were in unusable shape when I got them. The centers of the cutting edges of all the tools were either worn way down or were actually chipped out, but the bevels of the tools still had the coarse grit scratches on them from when the tools were originally ground at the factory. It was pretty obvious that whoever owned these tools never sharpened them, just used them right as they came out of the box until they were no longer usable. So the entire collection of tools needed the full sharpening treatment, from establishing the cutting edges, through honing those edges sharp, to polishing them for smooth operation. I took the opportunity to take some photographs during that work and to write down some notes as well. This page is the result of that documentation effort.
A word about the terminology. Clearly the process of getting a carving tool into useful shape represents a continuum and the terms sharpening, honing and polishing describe some areas along it. In this page I'm using the term sharpening to cover those operations that establish the cutting edge of a tool, but that probably leave the edge not actually sharp enough to use. As used here, the term honing means to get the established edge sharp enough for actual use, and polishing means to further refine the edge to the point where it is better and smoother.
I'm attempting to document the entire process of getting carving tools in shape to use, no matter what shape they are in originally. For the most part tools that are regularly used will just need to be honed and polished, but new or damaged tools, or tools that you bought used may need the full treatment.
Cleaning
Brand new tools and tools that you having been using will probably not need to be cleaned up before sharpening. Some brand new tools will have their blades coated with lacquer and this should be removed by soaking the blades in lacquer thinner or by using paint remover. Tools that are rusty should have the rust removed from the blades before sharpening. You can do this with chemical rust remover and or a wire brush. Note to those buying used tools - although surface rust can be removed with no problem, you may want to pass over any tools that are pitted with rust. Carving tools are easiest to use when the blades and smooth, and rust pits don't make for a smooth working tool.
Sharpening
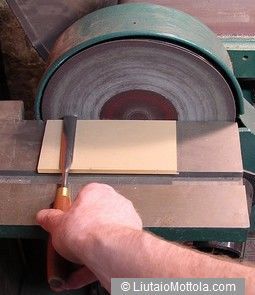
The first thing that needs to be done with carving tools that have worn or chipped edges is to straighten up the edges. This is not an operation that has to be done too often, but if a chunk gets taken out of an edge then the edge will have to be straightened out before any other sharpening operation is performed. Like a lot of luthiers I have a horizontal belt sander, and mine has a small disk sander on it. The disk sander with a 150 grit disk works great for straightening the edges of the gouges.

The small block of wood on the table keeps the tool square to the disk. If you don't have a disk sander then the edge can be straightened up by simply dragging it back and forth over a stone or file or other flat abrasive. A note of caution when using power sanders like this for sharpening operations. The high speed of the disk means that it is possible to generate a lot of heat very quickly, enough heat to take the temper out of the blade. This would be counter productive in a carving tool, so whenever I use power sanding tools for this purpose I keep a can of water handy. The edge is constantly being dipped in the water during the operation. In general I find that the tool should not be in contact with the disk for more than a second before the tool is dipped into the water. If you see the metal start to turn colors it has already gotten too hot.

After the edge is straightened up, a roughly sharp edge can be established on the tool. I use the horizontal belt sander for this operation as well. A 320 grit aluminum oxide butt seam belt works fine. Don't try this with a lap seam belt - it's just not smooth enough. Keep the water can handy, and keep dipping the edge in the water every second or so. Carving tools with straight edges, such as chisels and parting tools are sharpened right over the platen, with the edge perpendicular to the direction of the belt:

With the 320 grit belt progress is slow enough so you can both avoid burning the edge and keep it straight. There's no need to try to get it dead sharp here. I save that for a hand honing operation later.
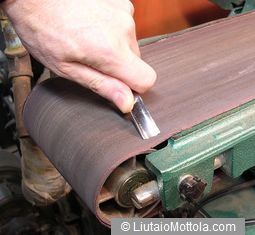
Although it's possible to sharpen the edge of a curved gouge over the platen of the belt sander, you can do a far better job if you position the gouge over the unsupported space between the end of the platen and the front roller.

For the curved edge tools, the edge is oriented parallel to the direction of the belt, as pictured. I have the belt stopped to take the picture, but as you can see the belt bends around the edge, making for a nice smooth and even sharpening operation. Click on the image for a bigger picture of this if the curving of the belt is not apparent here. Again, keep the edge wet to avoid burning the temper out of it. You want to establish a nice clean edge here, but you can put off making it seriously sharp until the honing operation.
If you don't have or don't want to use a belt sander, these sharpening operations can certainly be done by hand on any flat abrasive (stone etc.) of about 320 grit. See the honing section below.
Carving chisels (as opposed to bevel edge chisels) are sharpened on both sides on the belt sander. The gouges and parting tools are sharpened on one side only. The sharpening is done on the outside for out cannel gouges. But the inside surfaces must then be flattened. I do this with a bit of 320 grit sandpaper rolled around a small length of dowel of appropriate diameter for the gouges, and a small block of wood for the parting tools.

I'm lazy, so I don't spend too much time here, just a few strokes to make sure there isn't any wire edge left after sharpening the other side. Try to make it smooth if it is rough, but there is no need to work more than the smallest bit behind the edge. The fact is, you will be performing this operation many times to keep the tool sharp as you use it. You can spend the time up front to make the back dead flat, or you can just depend on the fact that it will end up dead flat over the course of many sharpening sessions.
Honing
You only need to sharpen if the edge got screwed up somehow. Most of the time when your tool gets a little dull the honing step is where you'll start. Like a lot of folks I eventually came around to the idea that the best tool for hand sharpening and honing is a piece of glass with sandpaper glued to it with spray adhesive. Using a tool like this means you always have a sharp, flat and big sharpening surface to work on. When the sandpaper gets clogged you can quickly scrape it off and glue on a fresh piece. I used a 1/2 inch thick piece of glass, long enough to glue 400, 600 and 1000 grit paper to one side.
These days though, I don't even bother with the glass, instead simply attaching the sandpaper to the cast iron extension wing of the table saw with long bar magnets. It works just as well as the glass, but there is no scraping and gluing involved. When you want to hone something, magnet the paper to the saw, hone, then throw the paper away.
Honing the chisels is pretty straight forward - just drag the edge across the paper, one side, then the other, until you've established a nice sharp edge. For the tools with straight edges the dragging motion is done perpendicular to the edge of the tool.

After the edge is honed on the 400 grit paper, I take a few strokes on the 600 grit paper and then tilt the angle up a bit and take one smooth pass to establish a nice double bevel. Then the same operation is repeated on the 1000 grit paper. By now the edge is pretty sharp.
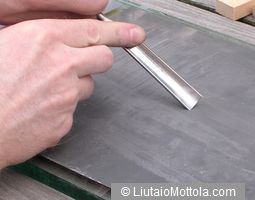
Gouges take a little more work, as the edge most be scrubbed sideways (motion parallel to the cutting edge) over the sandpaper, moving the gouge in a rolling motion. The motion is started with the near side of the gouge down on the far side of the paper:

and then the gouge is dragged toward you while at the same time rolling it toward you. The motion ends up with the far side of the gouge down on the near side of the paper:

I also try to establish a double bevel on the gouges, when honing on the 600 and 1000 grit paper.
After honing the single bevel tools (gouges, parting tools, etc.) the inside surfaces should be straightened up again. I use the same technique as described in the sharpening section - short lengths of dowel wrapped with the appropriate grit of sandpaper.
Polishing
Polishing the edge makes it even sharper, plus it makes the tool slip through the wood easier when carving so you can carve with less effort. It is definitely worth the extra time it takes to do this step as it will be more than paid back when you are using the tool. This is another step where the use of power tools makes for quick and easy work. A bench grinder with a hard felt wheel charged with green chromium oxide compound will polish up your well honed carving tools to scary sharpness. The outside of the edge is polished using the face or the side of the wheel:

And the inside surface of all but the tightest sweep gouges can be polished on the edge of the wheel:

If you don't have a grinder with a felt wheel, you can do a great job of polishing by hand with a piece of rough leather glued to a flat surface. Charge the leather with the same green chromium oxide compound and rub the gouge surface vigorously back and forth across the leather. Although it is slower, you can even forgo the leather and just do this with a flat piece of wood or cardboard and the green compound.
Once polished the tool is ready for use.


